Overview
Here's what the Ensembles application can store:
- Ensemble
- Ensemble name
- Ensemble short name
- Ensemble abbreviation
- Ensemble descriptions
- Eligible grades
- Status (active/inactive)
-
Members
- Student name
- School (helpful if you are teaching in multiple schools)
- Ensemble name
- Student ensemble voice part
- Grade
- School year
- Status (active/inactive)
- Office held
-
Library
- Item type
- Item location
- Count of available copies
- Item title
- Item artists (composer, arranger, etc.)
- Item voicing
- Item tags
- Item docs (pdf, image files, etc.)
- Item web links (ex. YouTube clip address)
- Performance dates
- Linked to respective program
- Pull Sheet checkbox
Setting Up Your First Ensemble
Clicking on the "Ensembles" card will display the Ensembles application with an empty table.
Click the green Plus-sign button to open the Ensemble form.

The ensemble form has six fields:
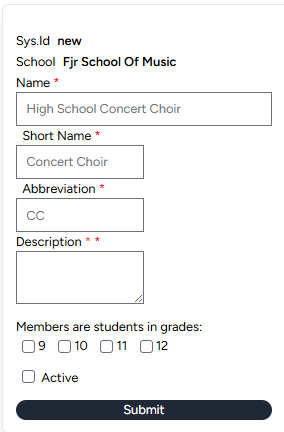
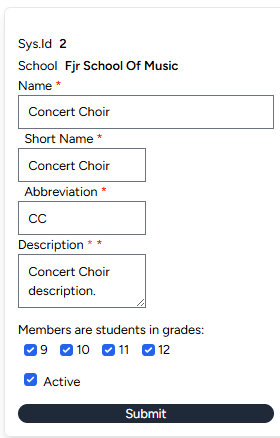

- Name: Enter the name of the ensemble.
- Short Name: Enter the short name of the ensemble. This is useful when space is cramped.
- Abbreviation: Enter the abbreviation of the ensemble. This is used on tables and forms to conserve space.
- Description: This box is small but can contains a very lengthy description of your ensemble.
- Grades: This series of checkboxes is derived from the "Grades You Teach" in the Schools application.
- Active: Use this checkbox to indicate if the new ensemble is active or needed for historical reference.
Note the "members" column on the ensembles table returns a ratio (0/0). These numbers will represent the total number of ensemble members throughout the years and the current school year's membership numbers.
Adding Members To An Ensemble
Clicking "Members" from the Ensembles tabs
 will display an empty members table.
Click the green Plus-sign button to open the Members form.

The members form displays some information and allows for two types of data entry:
- Information: Provides reference information for you to confirm that you're entering member
information for the right school and the right ensemble.
- Sys.Id: will display as "new" for a new entry, or a number for an existing entry. This is for reference information only.
- School: will display the current school's name. This is only relevant if you have multiple schools in your Schools application. In this case, the field will display as a drop-down box for you to select alternate schools.
- Ensemble: will display the current ensemble's name. This is only relevant if you have multiple ensembles. In this case, the field will display as a drop-down box for you to select alternate ensembles.
- Data Entry Types
- Individual Student, and
- Mass Add.
- Enter a school year
-
School years are identified by the last year, ex: the school year 2025-26 is identified
by 2026.
-
Enter a non-member student's first or last name.
- "Non-member" means a student who has not been identified as a member to the current ensemble in the selected school year.
- To save your typing, the system will automatically search for non-member students based on the school year identified above and the text input in Non-member Name field.
- These students will be displayed beneath the field for your selection (click).
-

- Click the student's name to display the remaining form fields:
-
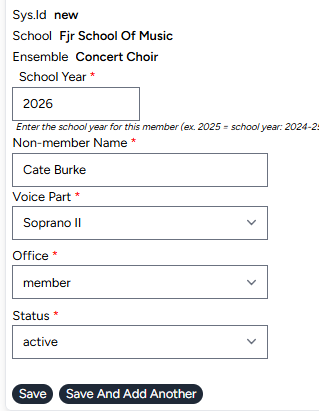
- Note that the system will automatically complete the "Non-member Name" and "Voice Part" fields using information stored for that student from the "Students" application.
- Note also that the "Office" field will default to "member" and "Status" field will default to "active". You can, of course, change these by clicking the respective drop-down box and selecting a different option.
- Clicking the "Save" button will save your data entry and then return you to the Members page.
-

- The ensembles page will reflect the change in membership numbers:
-

- Clicking the "Save and Add Another" will save your data entry, clear the fields, and allow you to continue to add students from the form.
-
The mass-add method may be a simpler route to add students to an ensemble, although visibly
challenging if you have many non-member students. "
-
The mass-add form has two fields and then as many checkboxes as there are non-member students who are eligible for the selected ensemble in the selected senior year (a proxy for school-year):
- Ensemble: Select the name of the ensemble.
- Senior Year: Select the appropriate senior year.
- Checkboxes: Click the check box of any student who is a member of the selected ensemble in the selected senior year.
When the "Save New Members" button is clicked, the selected students are saved as members of the ensemble and stays on the Member Mass Add. This is done to assist in cases where there are many non-member students and selecting students in small groups makes the effort a bit more manageable.
Ensemble Library
The Ensemble library provides a filtered view into your selected library displaying ONLY songs chosen from the Programs application specific to the selected Ensemble.
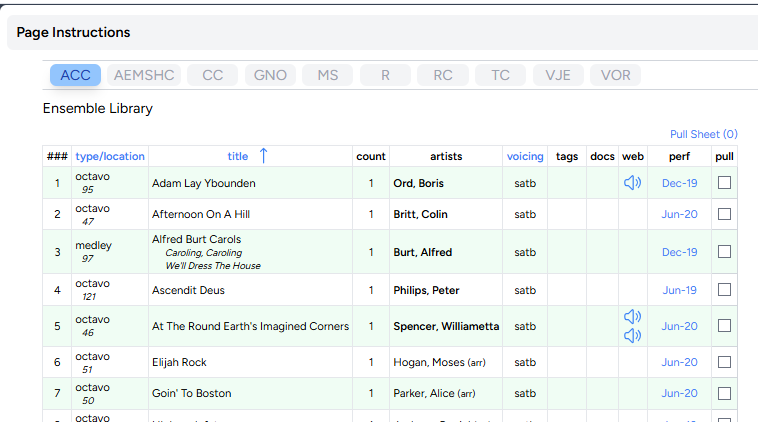
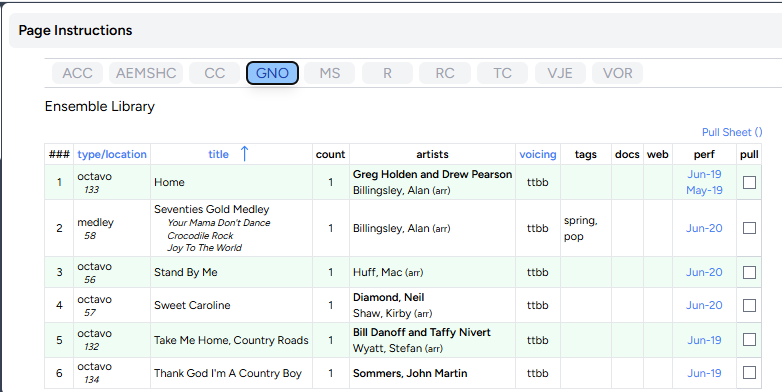
You may choose between your saved Ensembles by clicking the appropriate button at the top of the page using the Ensemble's abbreviation as it's label.

Once selected, the page will update to display the respective library items.
The "pull" checkboxes can be used to create a pull sheet for specific songs as needed.
